A canvas that I had mucked up, painted over in orange paint. A bit of vintage book paper, a scrap of old bed sheet, and an opshop butterfly. Oh, and sparkles, thanks to an old and broken bracelet. Not sure if I like it, but it does brighten up a dull bit off wall space.
Little things that are made with a little bit of love and a little bit of Roar!
Friday, 16 December 2011
Sunday, 11 December 2011
The Kindness
Sometimes, it is so hard to be positive.
This blog is my creative happy space. I don't mention my day job much, its hard (yeah I chose it, but I didn't choose the negative elements of it... which I won't go into here). But it also has its rewards. A smile, laughter, a student's achievement - big or small, watching amazing little people grow. Teaching, teaches me.
So Friday, at the end of a crazy week, one kind grandmother, who brings her grand-daughter to school each day, delivered me this beautiful bunch of flowers fresh from her garden, complete with a hug, a kiss on the cheek and some kind words. Just when you doubt yourself, comes that glimmer of hope, that reassurance that you are indeed on the right path. Thank you to that grandmother, grand-daughter and thank you to all the gorgeous children I teach.
Saturday, 10 December 2011
Kids Christmas Frames activity
Here's a fun little Christmas activity we've had running in our Kinder class...
Using paddlepop sticks and PVA glue, the kids made frames (with adult help). They decorated them with sequins, glitter, plastic rhinestones (the rhinestones needed hot glue). We tied the gold string on to make the frame hang and then added a photo of each child to the middle. The photos look really cute if you get a $2 store Santa hat and pop on the kids heads - makes them more Christmassy.
We then decorated brown paper sandwich bags to put our frames in.
They're pretty proud of their efforts - reckon they're parents might be a bit excited too.
Soap Gift Idea
What to give my work-mates for Christmas?
What can I make as stocking fillers?
Something simple, but nice....?
Then I thought of the lurvely eco-friendly, orangutan friendly soap that the local farmer's market sells. All handmade and absolutely delish! It just needed to be bundled up a little nicer.
So with an old Greenpages Magazine and Directory, some vintage book pages, and some hemp to make pretty bows, I started to get crafting.

It takes a bit of fiddling to get the folds nice and crisp, but I think they look rather cute!
Thursday, 24 November 2011
No-sew head-band
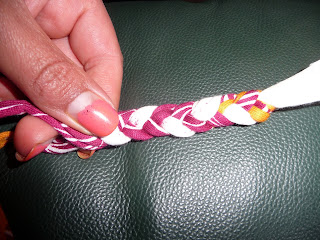
An easy little project with strips of t-shirt material. Simply plait three strands of t-shirt material and tie both ends off.
Loop a bit of hat elastic through for some extra stretch.
Then take two smaller bits of matching fabric and hot-glue around the hat elastic/tied of t-shirt sides of the head-band to give a more finished look.
Simple, fun and chic
Labels:
Hair accessories
Saturday, 29 October 2011
Easy Peasy Vintage Bunting
You will need:
- Pages from a book, magazine, paper etc (I chose a vintage book because the paper was firmer)
- Jute twine (just from a $2 store - have seen upmarket stores selling jute for $10 + recently)
- Clear spray varnish
- Hot glue
- Scissors
- Embellishments
The Steps:
Firstly, find a few nice bits of paper.
Then, using a piece of cardboard, create a triangle shaped template. Use the template to cut your nice bits of paper to size.
Then I sprayed my triangles with a bit of clear varnish. Just to make them a bit sturdier.
Fold the top edges over and then cut a length of jute. Begin to glue the jute into the folds. You could measure the distance between each triangle to make them a bit more uniform, but really, I couldn't be bothered!
After I had finished gluing the pieces to the jute, I decided I wanted the bunting to be a little bit more glam. So I added feathers and pearls. Just watch those fingers, the pearls were fiddly and well, lets just say me and glue guns have a bad track record!
I'm loving the end result on an old wardrobe I have at home.
Tuesday, 11 October 2011
party party party ring
No tute for this - but just thought I'd share anyway. This little number was made from:
- an old costume ring with stones missing
- some sari silk
- an old earring (its partner long lost)
- a needle and thread!
Sunday, 25 September 2011
Easy Peasy (and cute) Fridge Magnets
I saw a similar idea to this in an overpriced home-wares shop... seriously, I so wouldn't pay $20 for a four pack of these little things when they are so easily made, and especially when you can recycle bits of your own treasured bits of paper and fabric. You just need a few seconds and:
- a few craft magnets (mine were $2 for a pack from a $2 store)
- a few bulldog clips (mine were a few old ones hanging about the study)
- an old card, paper or fabric
- hot glue and gun
I had a lovely card that a student teacher had given me. I loved the print and decided not to throw it straight to the recycle bin. So I've cut the card in small rectangles to fit around the bulldog clip. Simply glue into place, and then glue a magnet over the top. Easy!
The finished result - wonderful for hanging up treasured art works by little people!
* Note, if you're not using a glossy card, you may want to consider sealing with PVA mix or Mod Podge?
Friday, 23 September 2011
Retro Earring Repurpose
I then slipped a jump-ring through the wire, bending the wire into a position so that the pendant hung straight. I threaded it on to black leather, and voila!
Will nicely match a ring with lapis I think!
:D Ani
Sunday, 11 September 2011
No tutes for these - but just thought I'd share what I have been making. These necklaces are the result of being stuck inside :) Made from sari silk, washed n recycled trousers/t-shirts/leggings, beads, feathers, repurposed necklaces... anything I can get my hands on really. I think my goal at the moment is to see how crazy I can push wearable art/jewellery.
Monday, 5 September 2011
A lazy cushion!
Ok, so I am a teacher on holidays, recovery time... And what am I doing on my first day off? Making cushions for school. My little Kinders love to curl up on our cushy cushions when they're feeling a bit sick or tired.
I didn't want to spend ages on these, in fact, they took only a few minutes of time to knock up. I got a long bit of fabric ($3 - Big W) and it had an ok selvedge, so the selvedge became the 'flaps' for the cushion.
I wrapped the fabric around the cushion (inside out) and pinned the unfinished edges in place, ready to be stitched by sewing machine.
Then turn inside and place over pillow or cushion.
Finished result:
Not as secure as a properly stitched cushion, but it will do for school just nicely!Saturday, 3 September 2011
Wednesday, 31 August 2011
Doiley Cuff Bracelet
I'd been toying with this idea for a little while now and I have slowly been chipping away at it this week in the evenings (now work's eased off a bit, I have time in the evenings - big tired grin).
Its a cuff-style bracelet - with a touch of whimsy. You need a thin doiley to do this, I'd looked at using a thicker doiley but it was just too chunky to work with.
First Step:
Fold your doiley into a rectangle.
Step Two:
Embelish as you like! I added buttons and a strand of faux pearls from repurposed necklace.
Step Three:
Add a clasp to the back. You could also stitch ribbons on to make a bow. But I knew that would annoy me, particularly if I decide to wear it to work.
The Result:
Saturday, 27 August 2011
Bright 'n' Bold Headband....
Cold & grey + feeling poorly + inside and needing colour = an accessory that is festivale and fun!
My inspiration for this little piece is a headband called "Camille" on Anthro... but a little out of my price-range and little 'safe' for my colour liking!
- A length of sari silk ribbon
- An old long sleeved t-shirt
Cut the sleeve off the shirt and cut two lengths. These two lengths need to go around 2/3 to 3/4 of your head. Cut two lengths of sari ribbon, contrasting fabric etc equal to the length of the shirt sleeve. Intertwine these like the photos below:

This will form the front piece of your headband.
Step Two:
Stitch the ends of each end together
Step Three:
Take a piece of fabric from the body of your t-shirt. This piece needs to stretch outwards and will be the back piece of the headband. Sew it into a tunnel and then turn inside out so you have a nice tube.
Step Four:
Assemble. Fold back the unfinished ends of the tube and poke inside the tube so that they can't be seen. Then poke the front pieces with the ribbons into each side of the tube. Stitch into place and Voila!
Take that bleary day!
Labels:
Hair accessories
Thursday, 25 August 2011
One for littlies!
We're having a bit of a Fairy themed morning tea at work tomorrow (long story) for one of our work friends/collegues! We needed to make some fairy wands in a hurry... but I do think these turned out cute for littlies.
Just shape into a star and wrap the wand part around the join in the star for a stronger wand!
Just shape into a star and wrap the wand part around the join in the star for a stronger wand!
Subscribe to:
Comments (Atom)


